From the Floor to the Middle of the Picture
Three Marks on the Same Wall
You stand at the wall with a tape measure, a pencil, and three different numbers from people who all sound sure of themselves. One friend swears by 57 inches to the center of the frame. Another sends you a link insisting on 58. A third mentions walking through a museum where everything seemed to land around 60.
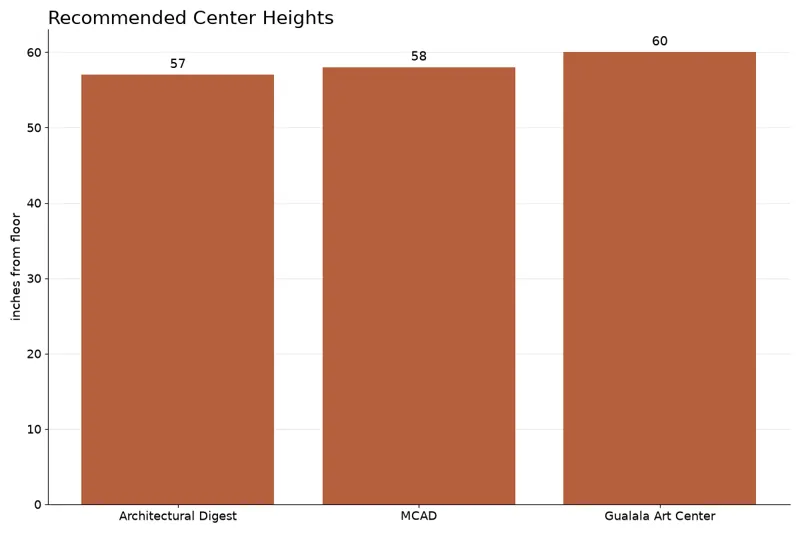
They are not making it up. Architectural Digest presents 57 inches as the golden rule and the height galleries and museums typically use, with no mention of the other figures. Yet MCAD Exhibition Services states the standard is 58 inches, plain as that. The Gualala Art Center says major museums center work close to 60 inches from the floor. Even the claims about what museums do do not agree.
Sit Down and Look Again
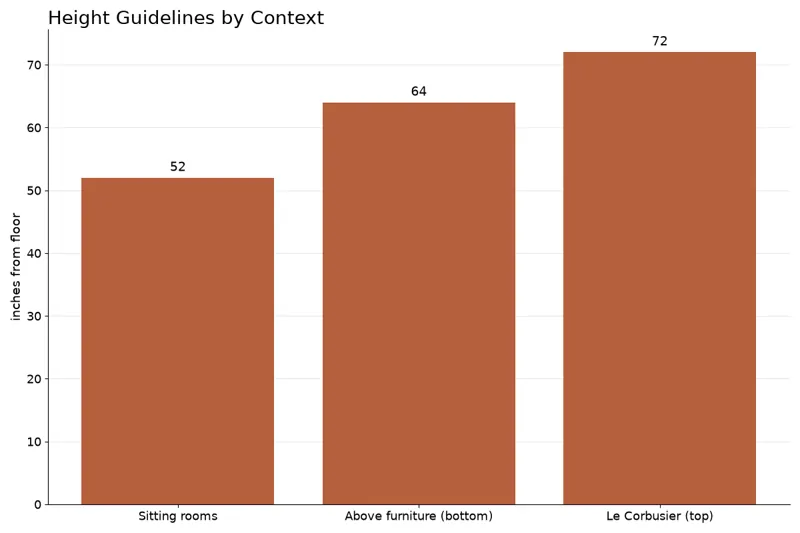
The center of a work traditionally lands around 60 inches from the floor in standing spaces, drifting higher with tall ceilings or large pieces, and lower in sitting rooms. Furniture introduces its own rules: interior designer Tyson Ness tells Architectural Digest to leave about 6 to 8 inches above a sideboard and a bit more above a sofa, and says most clients hang their pieces too high. Jay Heuman, curator of exhibitions at the Salt Lake Art Center, suggests 4 to 12 inches above furniture and about 52 inches from the floor in seated rooms, while the Los Angeles Times measures to the bottom of the frame, giving 6 to 12 inches above furniture or 60 to 64 inches above the floor, and advises adjusting if it looks wrong. Old Masters tend to be hung a little higher, and Le Corbusier specified about 72 inches, or 6 feet, from the floor to the top of the painting.
Frames, Gaps, and a Shared Line
A single small picture on a big wall rarely carries the room. A group needs enough pieces, a repeated frame or mat, and deliberate gaps to read as one composition. The New York Institute of Art and Design recommends similar bold frames for a shared theme, or the same color matting across a disparate collection. At 11 by 14 inches or smaller, a thin selection looks anemic, so do not skimp on the number of images.
Vertical order follows different conventions. The Gualala Art Center usually puts smaller work above and descends to the larger, while the Los Angeles Times says stack big canvases on the bottom and small ones on top, with the strongest piece in the middle. These instructions serve different contexts. What keeps the wall from feeling chaotic is remembering that Creative Director Ken Fulk, quoted by Christie’s, and the Arts Commission are talking about different jobs: a domestic hang where the pattern reveals itself as you assemble, and an exhibition where consistency keeps the room polished. Both are good advice; it just helps to know which job you are doing.
Hooks, Weight, and a Hard Stop
Some walls should not be drilled by guesswork. Check for electrical lines and water pipes first. In newer houses they usually run around the edges of the wall, but older houses do not always follow that pattern, so if you are not sure what is behind the wall, ask an electrician or contractor before you drill. A very large picture will not stay on a plaster wall with just a couple of simple screws; if you are inexperienced, use a slightly bigger fixing than you think you need.
Match the hardware to the weight and the wall: in drywall, a heavy piece can pull a plain picture hook out where there is no stud behind it, so use a toggle or molly bolt that expands behind the wall. Metal D-rings on each side keep a piece level without wire stretch, and double fixings stop it tipping forward. A picture rail suspends the work without punching holes. Where the surface cannot be patched easily, thin aircraft cable dropped from the ceiling avoids drill damage.
Sun, Radiators, and Damp Rooms
A drawing or watercolor has no business near a window. Christie’s art handlers warn against direct sunlight outright, and note that special glazes and airtight frame seals can guard against UV, humidity, and temperature swings. Canvas should stay clear of fireplaces and radiators, where heat can melt or slowly damage the surface over time. Jay Heuman adds heating vents to that list, along with bathrooms and kitchens, where humidity rises and falls unpredictably.
Mark the Wall Before You Pierce It
Lay the whole group on the floor first and move the pieces around until the spacing feels right. You do not need the same gap between every frame; some work wants more breathing room than others. Cut painter’s tape to each frame’s dimensions and stick those templates on the wall to map the arrangement before you make a single hole. Then have someone hold the actual work where you think it belongs while you step as far back as you can. That distance will tell you more than standing up close.
Before you drill, measure each artwork and note every obstacle on the wall, light switches, vents, outlets, doors, so you are not left with a sliver of space on one side and a gaping hole on the other. Center the piece horizontally over the furniture or the wall section, with the occasional off-center exception when the room asks for it. Mark the desired center of the frame, then measure from that mark up to the taut wire or the sawtooth hanger and transfer the distance. A spirit level and a tape measure keep the work straight, and a laser line level lets you place two hooks at exactly the same height. On a D-ring piece, measure each ring separately because they are often installed at different heights, and match the screw placement to the ring centers.
Hang the piece, check it once more with the level, and step back across the room; if you like what you see, you are done.